
Installing Smart Hexagon Panels
Instructions on mounting and installing Cync Smart Hexagon Panels
Quickly navigate to the section you need by following one of the links below.
Before You Begin
Prep the Surface
Installing the Hexagon Panels
Fasten Hexagon with Nails (Optional Steps)
Using the Panel Remover Tool
Removing and Repositioning Hexagon Panels
Troubleshooting Tips
Before You Begin
BEFORE ATTEMPTING THE INSTALLATION PROCESS, BE SURE TO READ ALL INSTRUCTIONS THOROUGHLY.
- Download the Cync app and power the first Hexagon Panel before installing. Complete steps in the Setting up Hexagon Panels article before continuing.
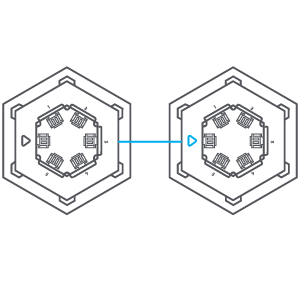
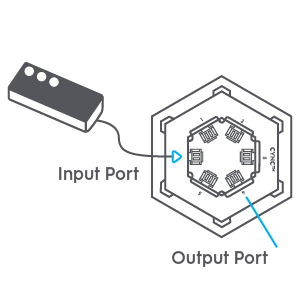
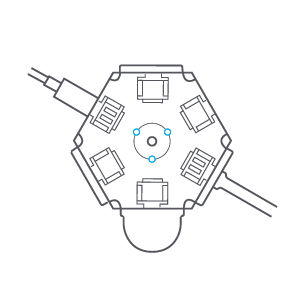
- Your Hexagon Panels include two types of ports: Input Ports and Output Ports. Your linking cables must be properly installed to ensure that each Hexagon Panel has power.
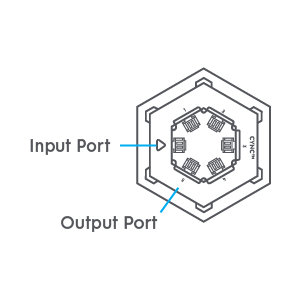
- Input Ports are identified with an arrow.
Power comes into this port. Connect the control box (first panel) or the linking cable from the previous Hexagon Panel into the port marked with an arrow. - Output Ports are identified with numbers. Power leaves through this port to provide power to the next Hexagon Panel in your design. Connect the linking cable to any one of the five ports to power the next Hexagon Panel in the sequence. Select the Output Port closest to the Input Port on the next Panel.
- Panels are connected in series. Do not use more than one Output Port on any Hexagon Panel.
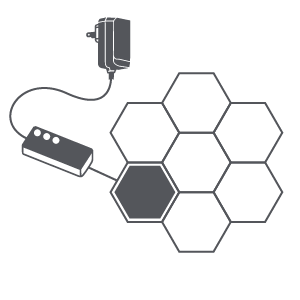
NOTE: One power adapter can power up to 20 Hexagon Panels. For any pattern needing more then 20 Hexagon Panels, you will need to purchase an additional set with a power adapter.
Prep the Surface
- Clean the wall with the provided cleaning wipe and let dry.
- Select a pattern in the Cync app or create your own layout.
- Use the layout template to create your design by peeling the backing off the removable adhesive and sticking the layout template to your wall.
- Each layout template must be touching at least one side of another layout template to complete installation.
- Adjust and position templates until you're satisfied with your design. Ensure your layout is aligned by using the included level.
- Determine the Hexagon Panel that will connect to the control box and power adapter. This will be the first panel installed in the next step.
NOTE: Double check your design before proceeding installation with the first panel. Once the Hexagon Panels are installed, they may be difficult to readjust.
Installing the Hexagon Panels
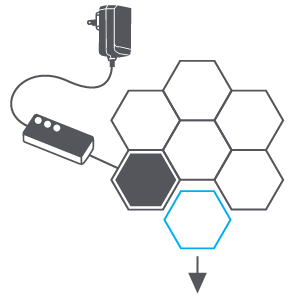
Installing the First Hexagon Panel
- Ensure the control box has been connected to the first Hexagon Panel.
- Determine the Output Port to connect to the second Hexagon Panel. Select the Output Port that's touching the side of the Hexagon Panel you're connecting to.
- Insert the linking cable into the desired Output Port before mounting wall.
- Remove the first layout template from the wall. Leave other templates in place for now.
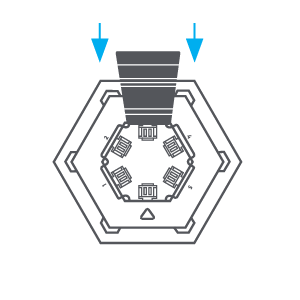
- To adhere the first Hexagon Panel to the wall use one of the provided removable adhesive pads. Remove the backing and place on the Hexagon Panel before the adhesive is at room temperature. Using the provided level, verify the Hexagon Panel is straight. Once it is straight remove the other side of the adhesive, then stick the Hexagon Panel to the wall. Press the center of the panel when adhering to the mounting surface for atleast 30 seconds. The panel has a higher chance of falling if pressing the edges, or not pressing the center long enough.
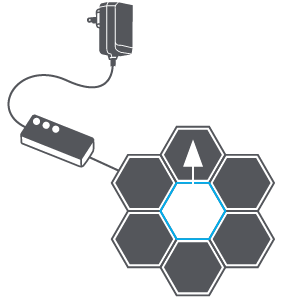
Installing Middle Hexagon Panels
Repeat these steps for all middle panels.
- Rotate the Hexagon Panel so that the Input Port side aligns with the Output Port of the previous Hexagon Panel.
- Determine the Output Port to connect the next Hexagon Panel. Select the Output Port that's touching the side of the next Hexagon Panel you're connecting to.
- Insert the linking cable into the desired Output Port before mounting to the wall.
- Remove the layout template of the Hexagon Panel you are now installing. Leave other templates in place for now.
- Insert the linking cable from the previous Hexagon Panel into the Input Port. After inserting the linking cable from the previous Hexagon Panel, the Panel should light up if the cable is connected correctly. If it does not light up, ensure the control box is plugged in and turned on, and re-check your connection.
- Use the Orientation Tool to properly align the Hexagon Panel. Slide the tool on the on the Hexagon Panel side that will touch the previously installed Hexagon Panel.
- When adhering the middle Hexagon Panels to the wall remove one side of the adhesive pads. Stick the exposed side of the adhesive to the back of the Hexagon Panel. Guide the Hexagon Panel into position by sliding the Orientation Tool over the side of the previous Hexagon Panel that is touching the one being installed. Once in position sitck to the wall while pressing and holding the center of the panel for atleast 30 seconds. Pressing the edges of the panel, or not pressing the center long enough can cause the panels to fall and possibly cause damage to the cables, or panel itself.
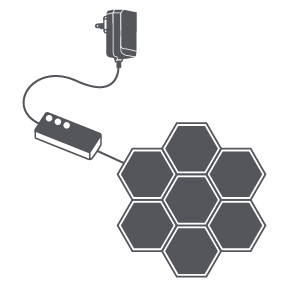
Installing the Final Panel
- Rotate the final Hexagon Panel so that the Input Port side aligns with the Output Port of the previous Hexagon Panel.
NOTE: There's no Output Port connection required for this Hexagon Panel. - Remove the last layout template from the wall.
- As with the middle panels, after inserting the linking cable from the previous Hexagon Panel, the Panel should light up if the cable is connected correctly. If it does not light up, ensure the control box is plugged in and turned on, and re-check your connection.
- Use the Orientation Tool to properly align the last Hexagon Panel.
- Adhere to wall by using the removable adhesive pads. Stick one side to the back of the Hexagon Panel and the other side to the wall. Press and gently hold for 30 seconds.
- Set up Light Shows, Music Sync, and Scenes all through the Cync app!
Fasten Hexagons (Optional Steps)
Adhesive pads may not adhere to all surfaces, including wallpaper, brick, textured, or porous surfaces. Nails may be required to complete installation.
- Disconnect the Hexagon Panel from power, then use the Removal Tool to separate the Hexagon Panel from its bracket.
- Place the mounting bracket on the wall with the Input and Output Ports facing away from the wall.
- Gently hammer three traceless nails into the provided nail holes.
- Orient the Hexagon Panel so the Arrows (Output Port) on the Hexagon Panel and its bracket align.
- Reconnect the Hexagon Panel to power.
Using the Panel Remover Tool
The Hexagon Panels can be separated from their mounting brackets by inserting the Panel Remover Tool between the Hexagon Panel and mounting bracket and gently unlatching the bracket. Repeat on each side of the bracket.
NOTE: If the Panel Remover Tool is not available, gently pull on only one side of the Hexagon Panel. Do not pull on the Hexagon Panel from two sides at once as this may cause damage.
Removing and Repositioning Hexagon Panels
To Remove:
- Unplug the Hexagon Panels.
- Use the Panel Remover Tool to separate the Hexagon Panel from the bracket.
- Pull the tab to stretch the tab slowly against the wall, then remove the bracket and linking cable. To avoid damage, use hand to hold the bracket when pulling. Never pull the adhesive tab towards you. This may cause damage to wall paint.
NOTE: In case of nail installation, remove the adhesive first, then hold bracket to pull out nails. - Repeat to remove all Hexagon Panels.
To Reposition:
- Unplug the Hexagon Panels.
- Use the Panel Remover Tool to separate the Hexagon Panel from the bracket.
- Pull the tab to stretch the tab slowly against the wall, then remove the bracket and linking cable. To avoid damage, use hand to hold the bracket when pulling. Never pull the adhesive tab towards you. This may cause damage to wall paint.
NOTE: In case of nail installation, remove the adhesive first, then hold bracket to pull out nails. - New adhesive strips will need to be purchased, as the ones used for initial installation are not reusable.
- Choose a new design and follow the install guide.
Troubleshooting Tips
One of my Hexagon Panels is not lighting up during the installation process.
- Do not continue to install the rest of the Hexagon Panels. If one Hexagon Panel does not light up, the subsequential panels will not either.
- Verify the connection to the Hexagon Panel is being connected via the Input port, indicated by an arrow. Be sure that this connection is seated properly.
- Verify that the connection from the previous Hexagon Panel is seated properly. You may need to remove that Hexagon Panel from the bracket to verify.
- If all connections look correct, try a different Hexagon Panel.
- Factory reset the Hexagon Panels.